Today, we’re happy to announce that we’ve officially launched the Botmakers Certification Program!
Marketing agencies and chatbot experts use certification to demonstrate their proficiency level in chatbot marketing, improve professional credibility and make yourself an industry expert.
Currently, we offer a certification program for ManyChat platform. Soon, we add more certification options for platforms like Chatfuel and MobileMonkey.
After passing the certification test, you get a high-resolution PDF certificate and digital badges that prove your credibility so that you can market yourself (or your agency) successfully and effectively in front of leads or existing clients.
What do you need to enroll? The rules are simple: 1. Choose your program here https://botmakers.net/certification/. 2. Complete a short registration form. 3. Pass the test with a score of 85% or higher. 4. Get your certificate and digital badge.
If you hesitate about your current level of knowledge – nothing to worry about. – First, you have 5 attempts to retake the test. – Second, we prepared some free resources that increase your knowledge and help you prepare better. You will find them here.
If you are familiar with ManyChat and have built a few bots already, don’t lose the opportunity to unlock the full potential of your chatbot agency, start getting certified.
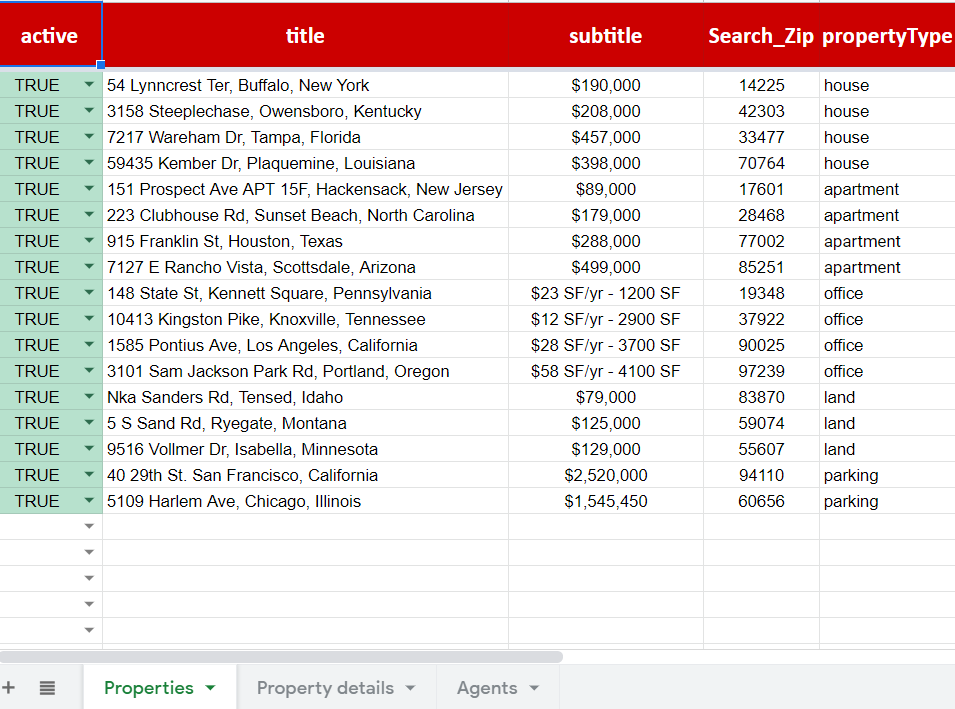
Managing bot content for real estate agents might be daunting, especially when the list of available properties continually updates. Manage property listings from Google Sheets and generate dynamic galleries based on a visitor’s search criteria in a chatbot seems to be an ideal solution to save time and effort for realtors.
To make this work, you’ll need a Botsheets account, a ManyChat template and a Google Sheets template (includes in the ManyChat template).
P.S. The instructions on Botsheets set up, you’ll find inside the ManyChat template as well. Let’s get started…
Generate a gallery of results
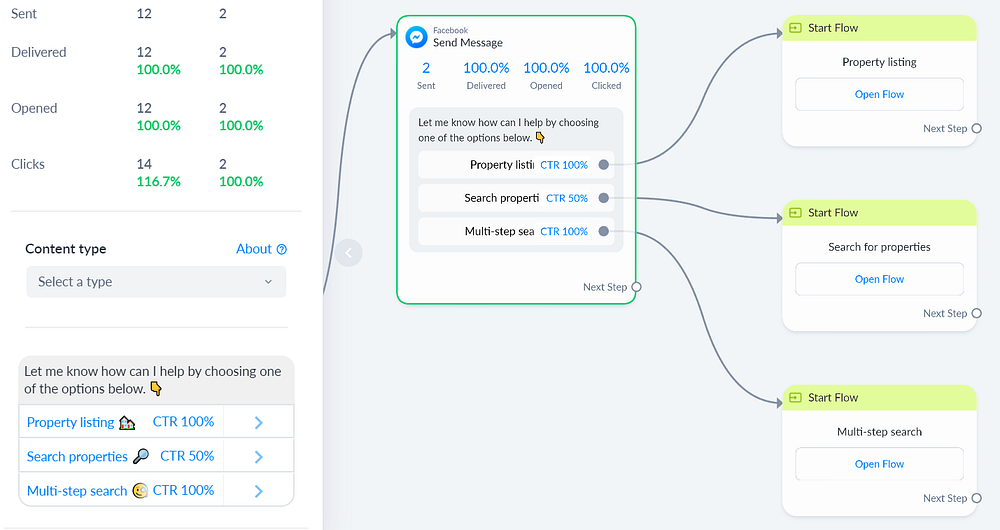
Once the template is installed and Botsheets is set up, your bot is ready to go however you’ll want to adapt the bot for personal needs. In the main flow, you can see three main actions:
Property listing
Search properties
Multi-step search
Property listing flow generates a gallery from the ‘Properties’ worksheet and shows the list of all the properties available. All you need is to add your data into the columns and it’ll be immediately updated in your ManyChat bot.
Search properties flow searches the keyword column (Column L) of the ‘Properties’ worksheet using a custom user field value taken from the user’s message.
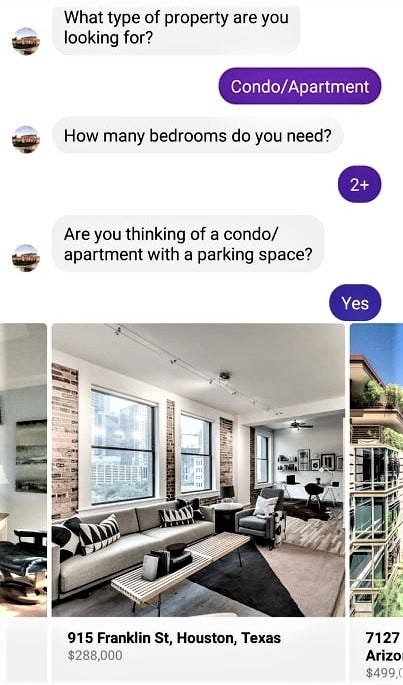
Multi-step search flow searches in the ‘Properties’ worksheet with advanced methods using 2 or 3 criteria provided by users and generates a gallery of search results.
Example: if a user is looking for an apartment with 2 or more bedrooms and also need a parking space, the bot will show only apartments that match these criteria otherwise reply with a message of no success in search.
Single-family/House -> How many bedrooms -> Swimming pool Condo/Apartment -> How many bedrooms -> Parking Office -> Space size -> Parking Land/Plot -> Warehouse Parking -> How many parking spaces
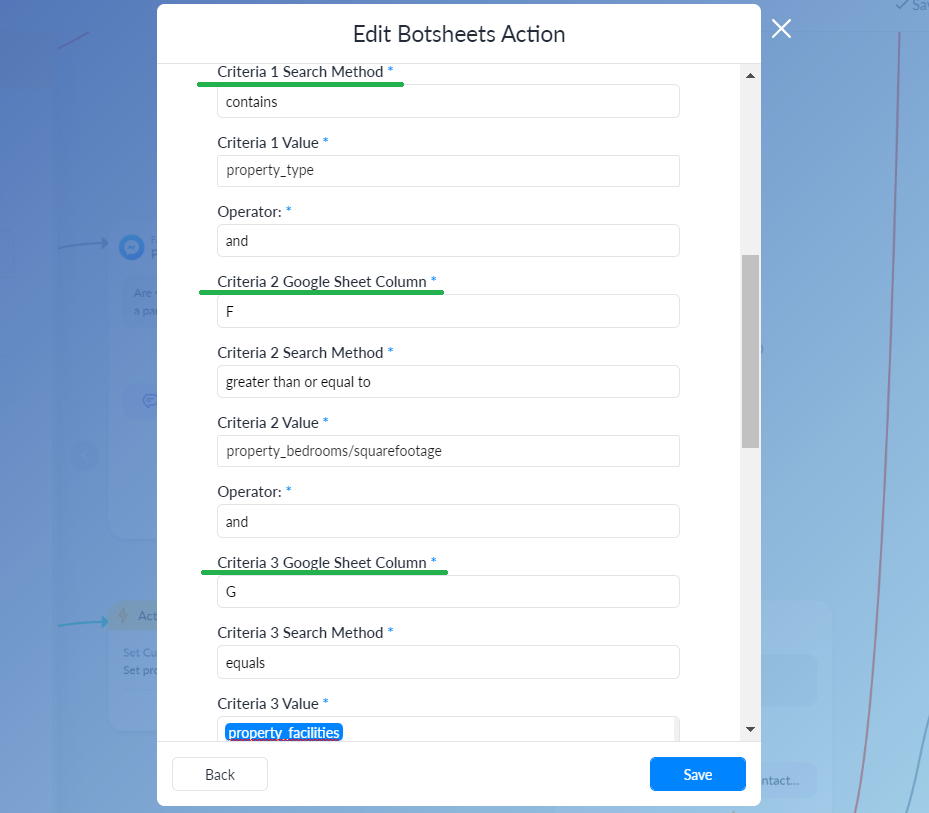
If you need to customize search criteria, refer to the Multi-step search flow and columns E, F, J, H, I and J in the ‘Properties’ worksheet.
Show details of each property
If you want to show more information about each property type, e.g. add a property description, show more photos, etc., we’ve got you covered.
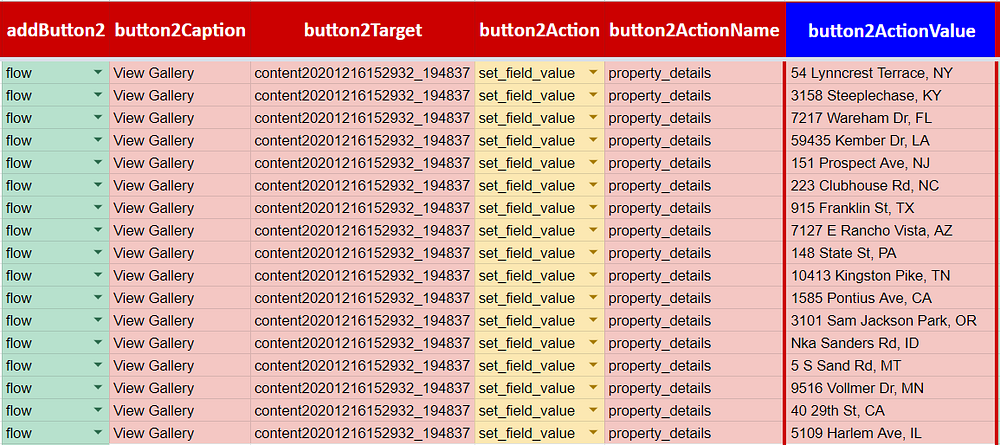
We’ll need the following columns in the ‘Properties’ worksheet:
addButton2 – set it to the ‘flow’ so the button will open a new flow. button2Caption – give your button a name. button2Target –find the flow ‘Property details’, copy the target after files/ and paste it in the worksheet.
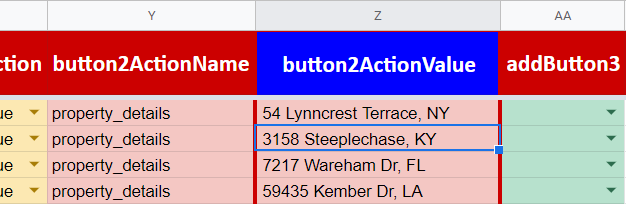
button2Action – set it to the set_field_value. When clicking a button under a specific card, the bot will save the value to the ‘property_details’ custom field. button2ActionName –this is the name of a custom field. It must be exactly the same as in your ManyChat otherwise it won’t be working properly. button2ActionValue – these are the actual values for these custom fields.
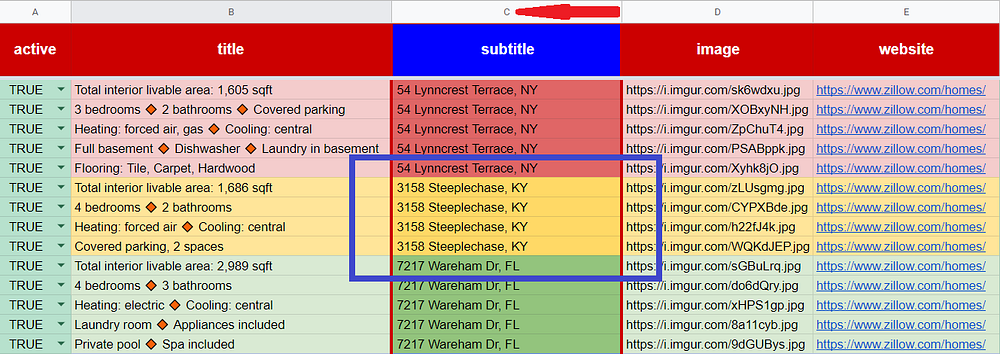
Note: the bot compares these values and refers to column C in the‘Property details’ worksheet.
So if the ‘button2ActionValue’ in the ‘Properties’ worksheets is ‘3158 Steeplechase, KY’,
the value in the ‘subtitle’ (column C) in the ‘Property details’ worksheet must be exactly the same. In that case, the bot will show photos and description added to columns B and D (‘title’ and ‘image’).
Here’s how you can use Botsheets to show a gallery of photos for each property type in your ManyChat bot. Enjoy and Thanks!
Chatbots provide an instant and easier way for visitors to engage with your brand. To become a winner, any online business would be wise to hit the ground running invest in a bot that engages their audience and in turn, acquire clients or creates sales.
If you are starting an agency or planning to add bots to the list of services you offer – do not start from scratch – we’ve already developed 170+ universal sales & marketing bot templates, available for different niches and business profiles. Our favorite and most popular categories are:
With the variety of communication channels available today, we at Botmakers, focus on the following 👇 platforms and channels.
Facebook Messenger channel
Our templates for Facebook Messenger are designed and built on the platforms like ManyChat, Chatfuel and MobileMonkey.
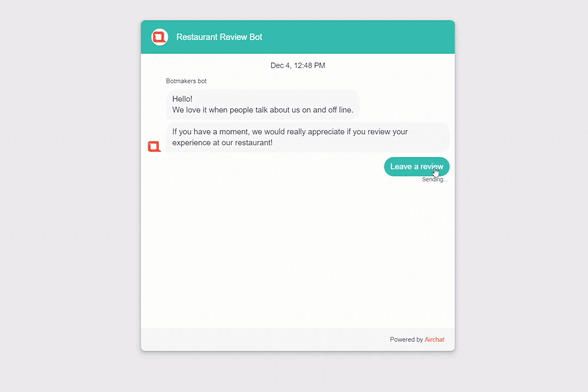
Facebook Messenger chatbot templates perform especially well for sales, lead generation and contests/promotions. To experience Facebook Messenger bots, follow the links below.
Website chatbots are free from Facebook and its Policy. In other words, they give freedom to website visitors from signing in with a Facebook account in order to interact with a bot.
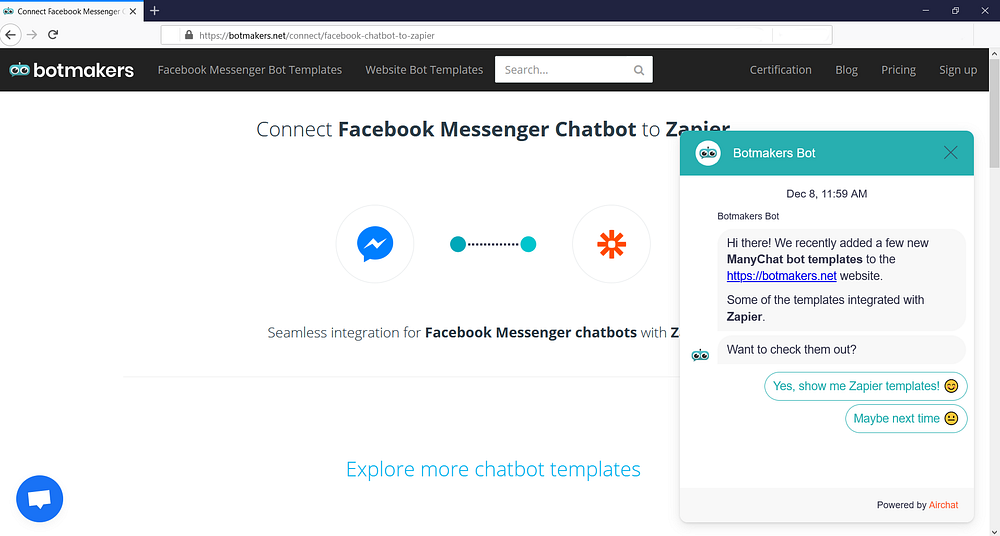
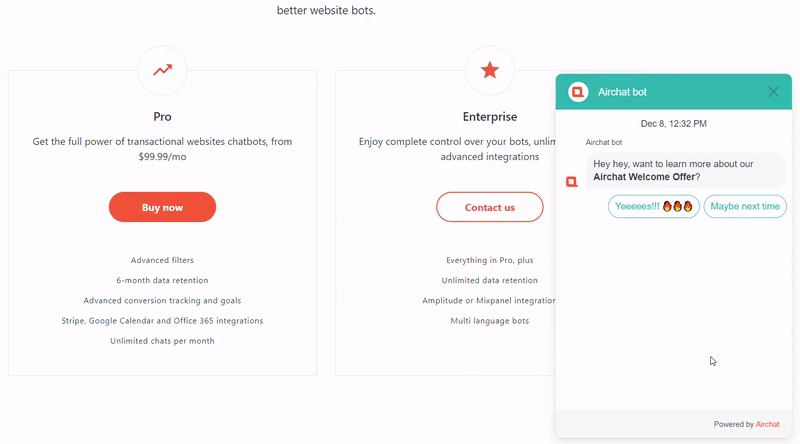
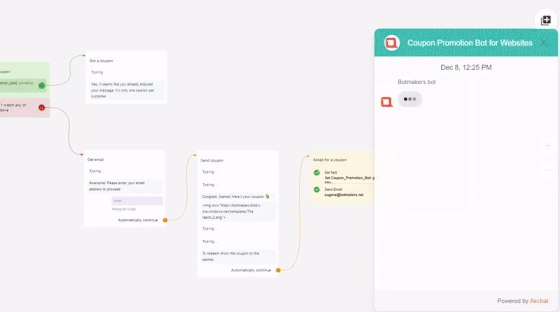
For website bot templates, we use Airchat platform – a drag and drop editor which allows you to engage with website visitors, generate leads, schedule meetings, collect payments and more. To see website bots in action, use the links below.
ManyChat platform allows sending email notifications to your contact right through the platform. The feature is available on a Pro plan, to see how email notifications work, feel free to test one of our templates.
Combining bots and email is extremely powerful. We, at Botmakers, send emails using Sendgrid. If you want to integrate your Messenger bot with Sendgrid and send emails to your bot subscribers effectively and with high open rates, we’ve got you covered. Take a look at this post to set it up for your bot.
📧 To see how the integration of the Facebook Messenger bot with Sendgrid works, check out this template.
SMS channel
SMS marketing is the perfect communication channel for concise, important information about discounts, purchase confirmations, appointment reminders, abandoned cart reminders or any other information you want to get in front of your audiences’ eyes immediately. 90% of text messages are read within 3 minutes, making SMS the best medium for any time-sensitive messaging.
According to new Facebook rules, you can send as much promotional or non-promotional stuff as you want, in the only first 24 hours of a user opt-in to your messaging. You must keep this in mind otherwise, Facebook can take away some of your privileges if you break the rule and in some cases even ban the whole page.
The magic is – you can send as much promotional or non-promotional stuff as you want via SMS and there is no 24 hours rule.
Currently, ManyChat allows us to connect SMS marketing channel in the following countries: Canada, Great Britain and United States.
We’re currently using SMS campaigns at Botmakers’s bot and it made us 3-5% of total sales for the last few months. On autopilot! 💬 Our bot is made on ManyChat and we use Twilio for SMS marketing. Using Twilio, you can send SMS through your bots around the world.
Instagram channel
Instagram bot templates are coming to Botmakers in August 2021.
Bot Demo Pages
Bot Demo Pages is a Win-Win tool for marketers to pitch bots to clients. The best thing about our templates and, particularly, the Bot Demo Page feature, is that you can immediately exploit the ready bots without the necessity to plunge into the development and creative process, spending a lot of time on production.
You can set up a demo on your own and start pitching bots to clients in seconds. Since all templates are white-label, you can adjust them to your brand by placing your company name, logo and favicon on the pages.
Transitioning from a chatbot agency to a SaaS company is a strategic move that can significantly scale your business. By developing your own products, you can tap into recurring revenue streams and reach a wider market. In this article, we’ll explore some chatbot agencies that have successfully made this transition.
BotsCrew began as an agency offering chatbot-building services but later developed its own chatbot-building framework. This framework allows companies to create AI-powered chatbots efficiently, helping them scale their customer service and engagement capabilities.
Botmakers started by selling chatbot project leads and then transitioned into a marketplace offering chatbot templates. This shift enabled businesses to quickly deploy chatbots without the need to start from scratch, tapping into a broader customer base.
Tars began as a chatbot development agency and later transformed into a SaaS platform focused on creating conversational landing pages. Their product helps businesses increase conversion rates by providing interactive, engaging experiences for users, leading to more efficient lead generation and customer support.
BotSupply, a Denmark-based agency, evolved into a SaaS company specializing in AI-powered chatbots and conversational interfaces. Their platform allows businesses to create multilingual chatbots, providing global customer support solutions.
Take is a Brazilian company that started as an agency and later launched its chatbot platform, BLiP. This platform helps businesses manage and deploy chatbots across multiple channels, providing a centralized solution for customer communication.
We Build Bots, a London-based agency, transformed into a SaaS provider with their AI-powered customer service platform, ‘IntelAgent.’ The platform helps businesses automate customer support tasks, reducing operational costs while improving customer experience.
Leena.ai started as an agency but later joined Y Combinator and built a successful HR chatbot platform. Their solution automates employee interactions in areas like onboarding, payroll, and HR support, offering companies a scalable way to manage HR queries.
These examples highlight how chatbot agencies can successfully transition into SaaS companies. If you know of other agencies that have made this shift, please share them in the comments or email me at [email protected]. Let’s continue the conversation on how agencies can scale and innovate in the chatbot industry.
Would you like to provide a reliable weather forecast for your customers so they can check if the weather is suitable for planned activities? Do you want to deliver better customer experience through your chatbot?
If Yes, this 3-minute read guide designed to help you add the feature to your ManyChat bot and deliver weather information specific to a location for today, tomorrow or the next week.
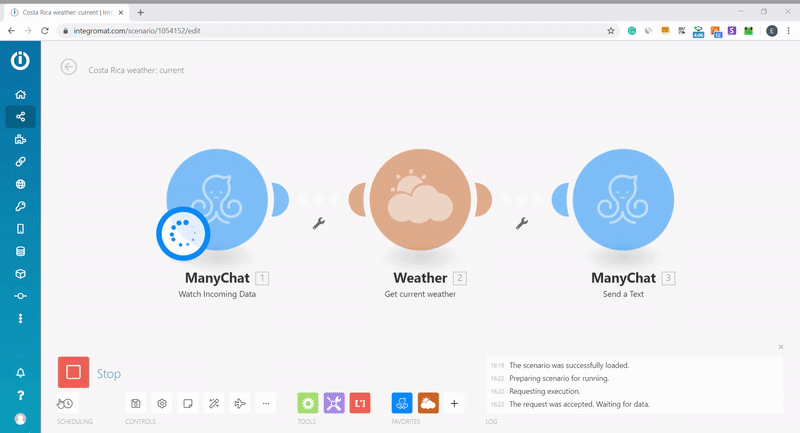
⚈ To connect your Manychat account to Integromat you need to obtain the API Token, you can get it here: Manychat dashboard > Settings > API > Generate Your Token 👇
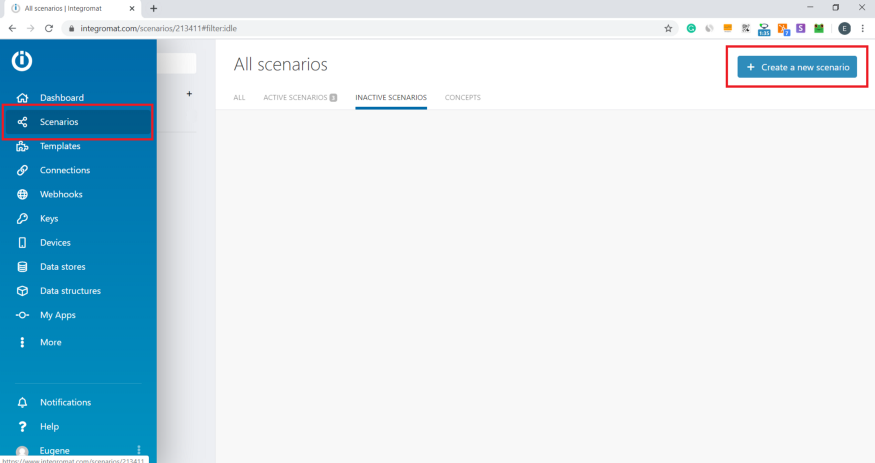
⚈ Copy the provided token, go to Integromatand add a new scenario: Integromat > Scenarios > Create a new scenario 👇
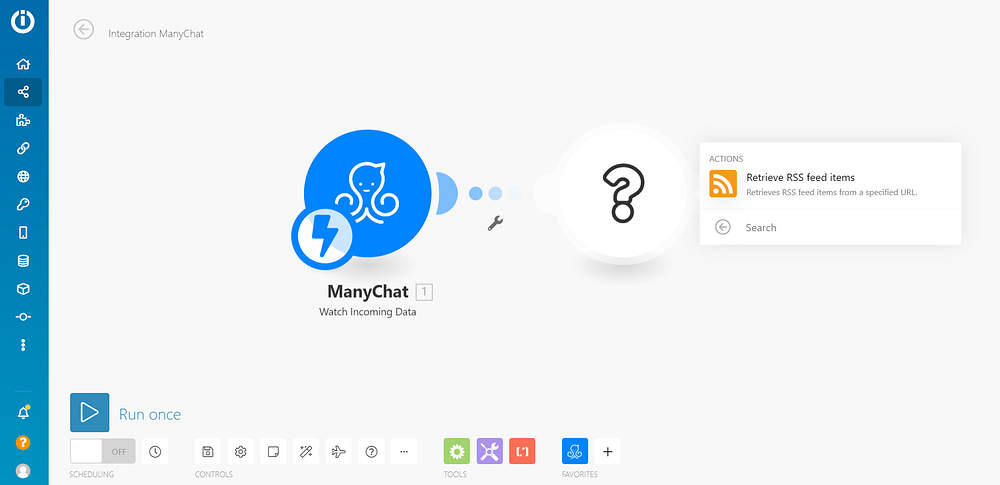
⚈ Add ‘ManyChat’ module as the first module in your scenario and select ‘Watch Incoming Data’. This triggers when a ManyChat action is performed and returns subscriber’s details.
Enter the name for the webhook and then, enter the API Token you have copied to the respective field.
Click the ‘Continue’ button to establish the connection. 👇
⚈ The next step is to connect a weather app.
Choose ‘Get current weather’ if you’d like to show your customers current weather, current temperature, etc. Choose ‘Get daily weather forecast’ if you’d like to show the weather forecast for tomorrow, in a week, etc.
Enter a needed location by city or by coordinates
Add ‘ManyChat’ module as the third module in your scenario and select ‘Send a Text’.
Add ‘Subscriber ID’ in the appropriate field and choose what information you want to send to your bot users. 👇
⚈ Save and Run your scenario.
Now get back to ManyChat to trigger the ‘Watch Incoming Data’ module.
Add an action to your ManyChat flow: Actions > Trigger Integromat > Choose Your Webhook > Make the flow published > Click ‘Preview’ 👇
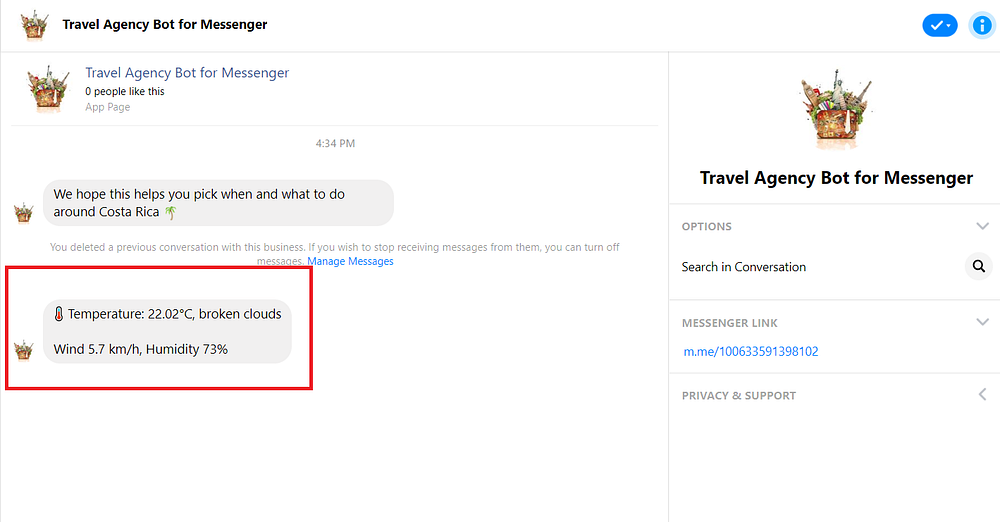
⚈ If everything is set up correctly, Integromat will send a message: ‘The scenario run was completed.’ and you will receive a message in your Messenger bot with the weather information. 👇
Introducing bot templates for websites an easier, faster and fully flexible way to realize the full website’s potential and provide a better customer experience in the right place and at the right time.
Here at Botmakers, we believe that the right chatbot is an indispensable colleague for any business and that chatbots work not only for messaging platforms. Introducing WEB BOTS: simple, professional, high-conversion and code-free bot on your website that you can customize exactly as you need.
What are the benefits?
Self-sufficiency – web bots are free from Facebook and its Policy. In other words, they give freedom to website visitors from signing in with a Facebook account in order to interact with a bot (that’s what standard Messenger widgets installed on the site can’t brag about).
That means you significantly save your potential customer’s time which positively affects your conversions.
Imagine those who don’t have a Facebook account at all. In that case, a web bot might be your saving grace by letting visitors interact one-on-one with a bot on your website.
P.S. Facebook constantly changes Messenger platform privacy policies. You have to follow and keep your bot up-to-date otherwise your Business Facebook account might be blocked.
Why use website bots?
The average conversion rate on a website generally sits in the ~1% range. One of the most effective ways we see web bots being used is to help potential leads who might not have converted without chat. Sometimes a quick question or a proactive offer to help can be the difference between average conversion rates and filling your pipeline full of qualified leads.
Another effective way of using web bots is to generate more qualified leads. With the help of a bot on your website, you can easily share valuable content with your website visitors. As an example, you can use a bot instead of a landing page and share your e-book, a PDF, or a coupon through the bot once a lead has given their email.
How web bot can fuel your website and your business?
1. Personalize the customer’s experience
Web bots give an opportunity to identify website visitors and personalize their experience, that’s what chat widgets can’t cover as well.
Using web bots you can have a specific bot on a specific website page.
Web bot can deliver the right message for every visitor and every web page to engage them in a personalized way.
You can see who your visitors are, where they came from, and how they interacted with a bot.
2. Get full control of your web campaigns
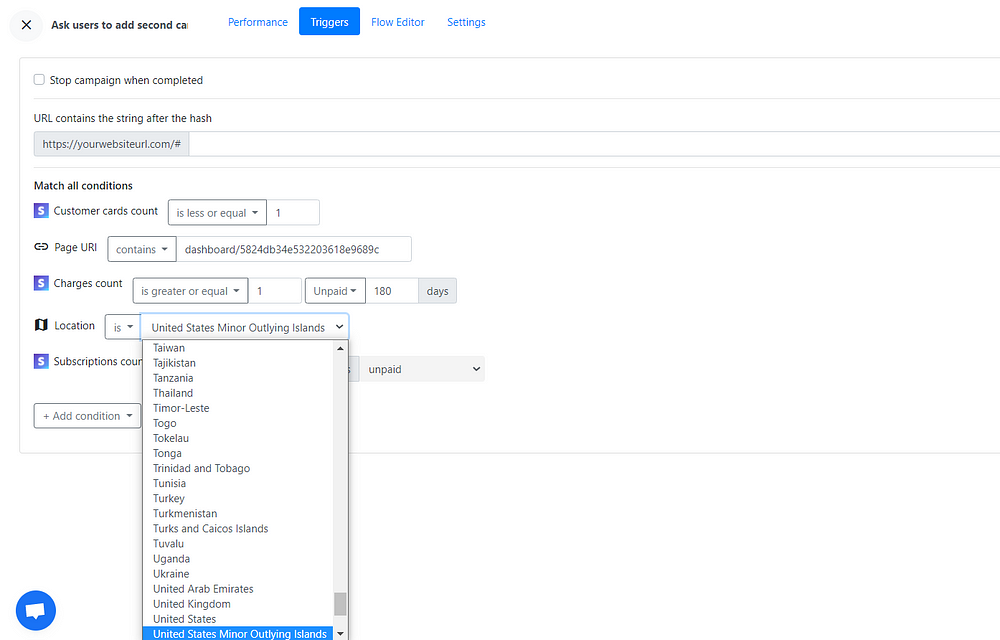
With web bots, you can filter your campaigns by page URL.
Filter by location – country and/or city.
Filter by goals and completed campaigns.
Filter your campaigns by referring websites.
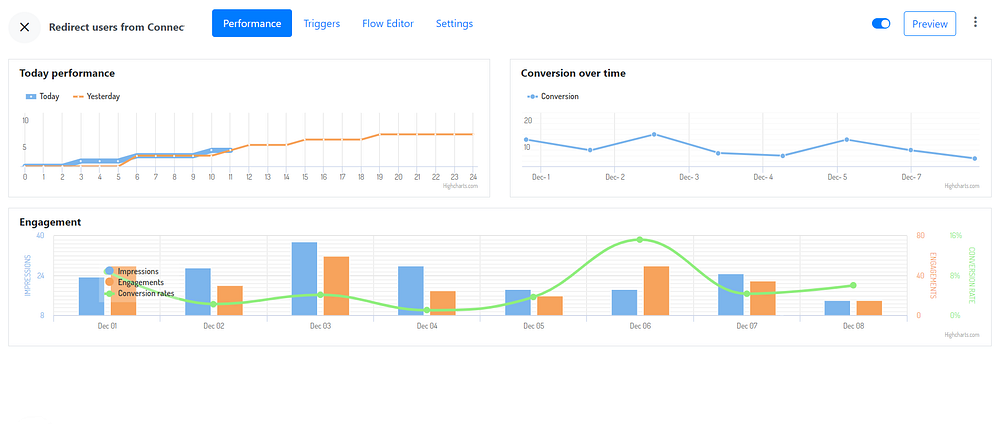
3. Streamline your campaign performance
Web bots provide analytics so you can optimize your bots for high conversion rates with no hassle.
Real-time reporting
Campaigns and goals performance
Conversion over time
Impressions and Engagement charts
There are a couple more benefits of using website bots:
Creating a website bot is fast and the results are in. There’s zero programming in website bots to learn. The best bit? First web bot templates are already available with your Botmakers subscription! They are completely customizable, so you’re in control and can adapt your bot exactly as you need.
So, if you plan to use your bot for onboarding, collecting data from customers, collect payments, supporting or engaging in real-time – Web Bot is a good marketing investment!
We hope you’re as excited about website bots as we are! Get started with your Botmakers plan and get full access to all Botmakers Templates for Website (more and more templates are coming soon) and Facebook Messenger.
About the author
Eugene Smirnov is the Head of Templates Production at Botmakers with 3 years of experience in the business.
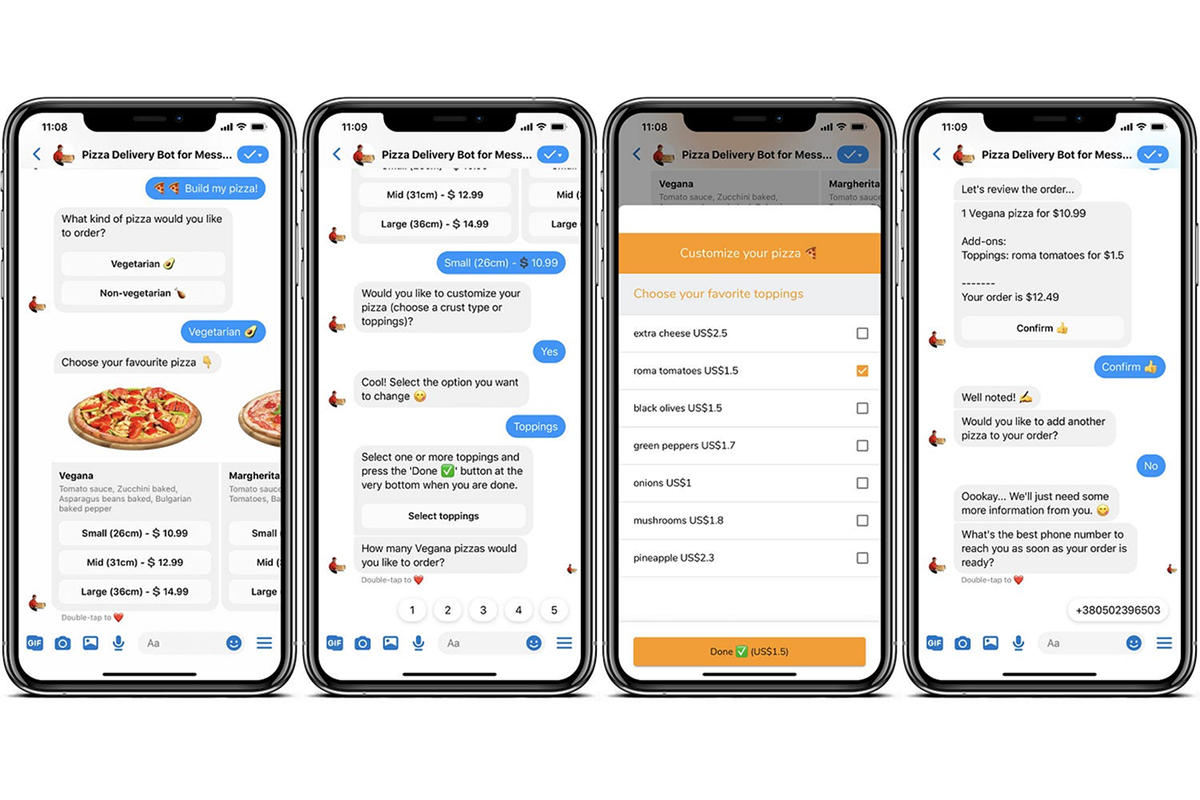
For pizza restaurants that plan to run (or use already) the Pizza Ordering and Delivery Messenger Bot and ready to get more from it, we updated the template and added even more useful features. Ordering pizza for customers has never been so easy!
How to set this all up
1. Get the template on your dashboard and install it to your ManyChat. The Botsheets app will be installed automatically alongside with the template.
3. Click the ‘Share’ button at the top right and change the settings in Google Sheets so that ‘Anyone with the link can view’. Copy the shareable link and paste it somewhere for now so you can access it.
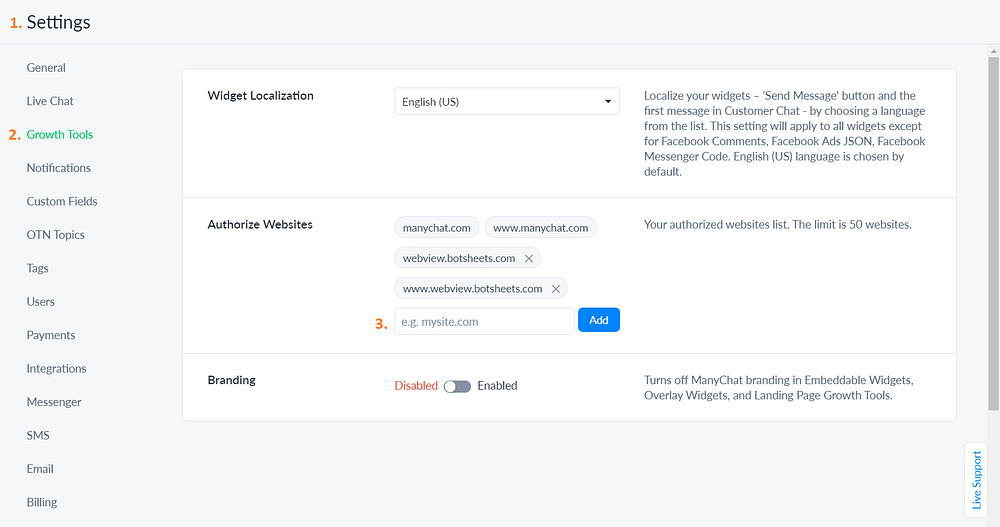
4. Go to your ManyChat Settings/Growth Tools/Authorized Websites and add webview.botsheets.com to the list.
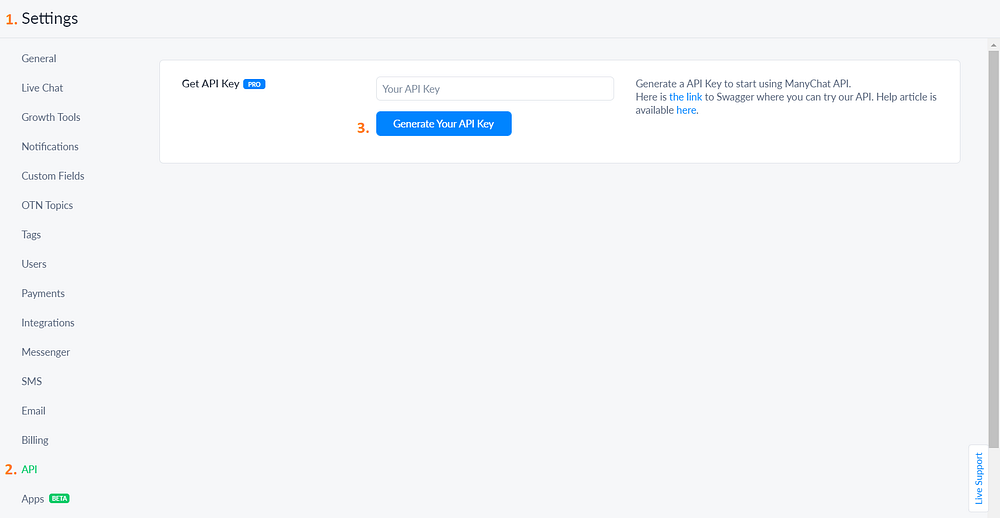
5. Go to ManyChat Settings/API/Get API Key and generate your key. Copy your API key.
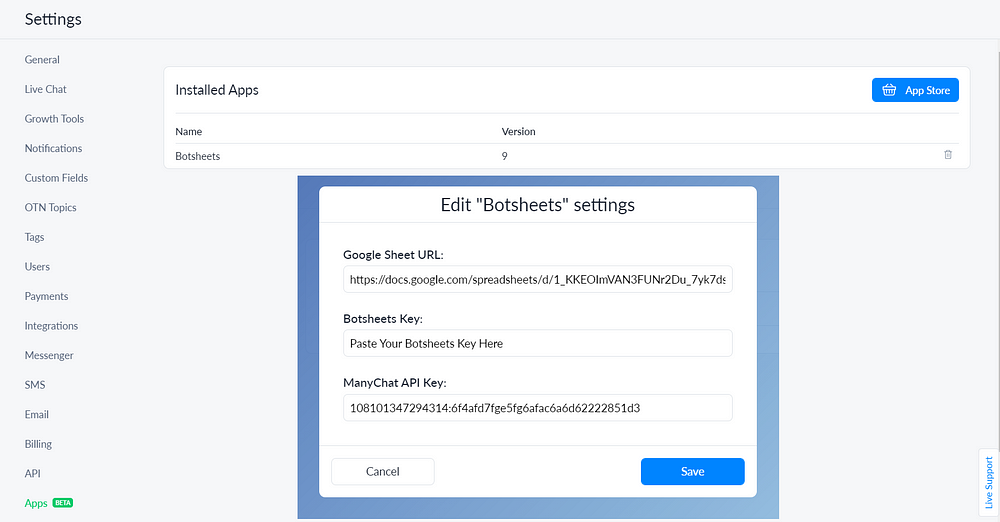
6. Go to ManyChat Settings/Apps/Installed Apps, add the link to your Google Sheets template, your Botsheets key and your ManyChat API key.
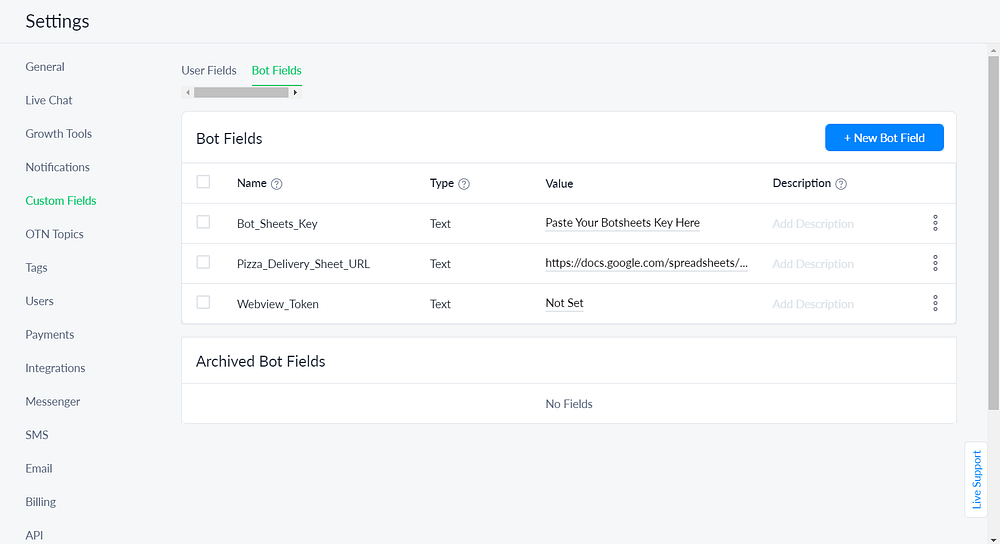
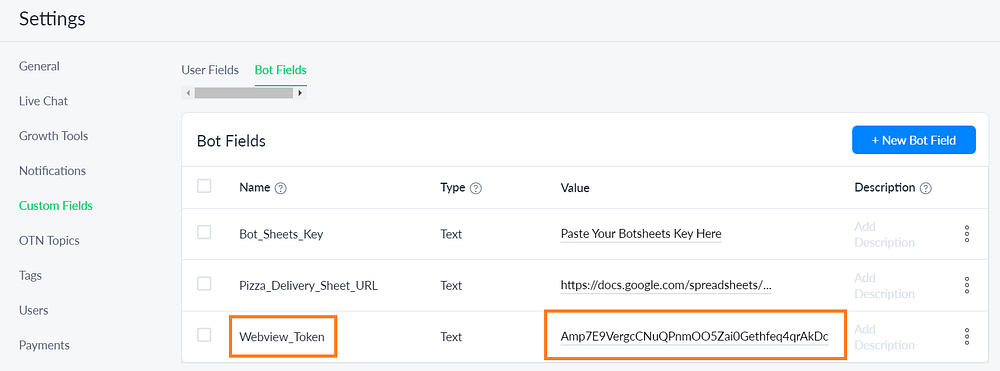
7. Go to ManyChat Settings/Custom Fields/Bot Fields, add your Botsheets key and the link to your Google Sheets template. We’ll add a Webview_Token link a bit later.
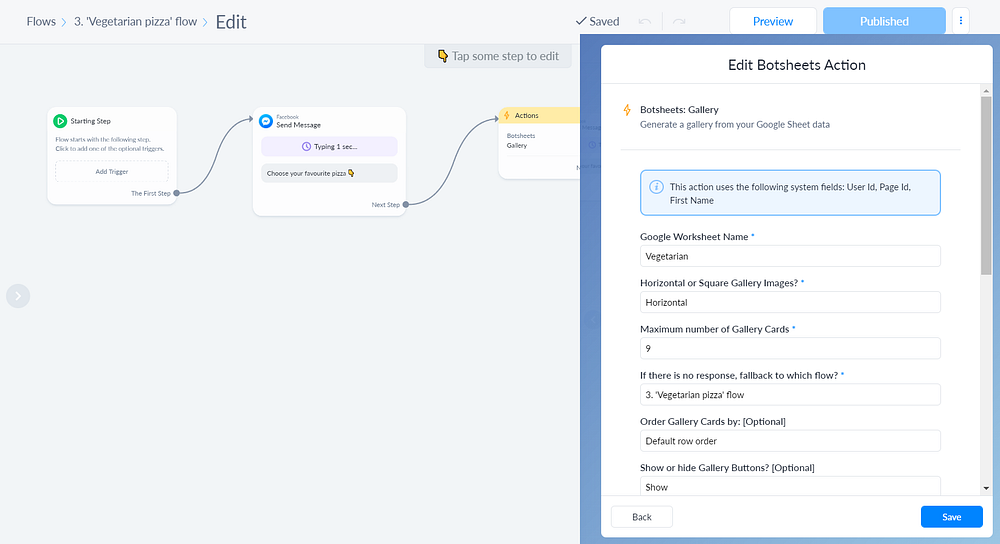
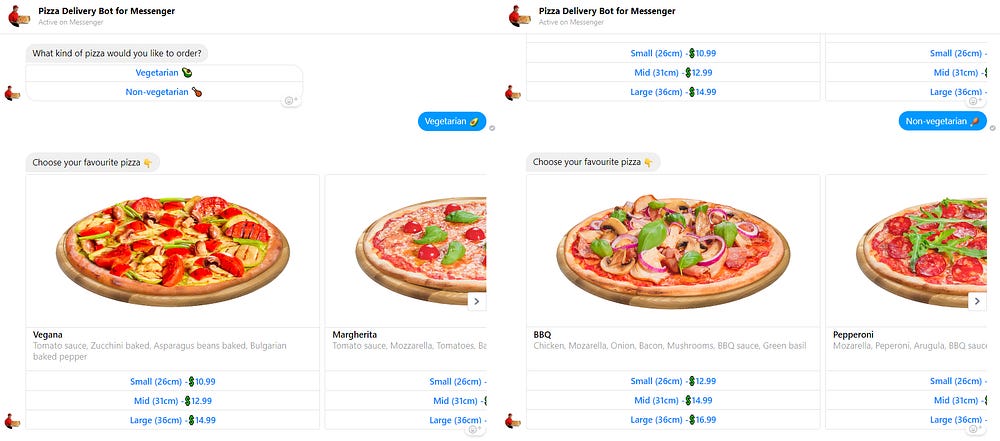
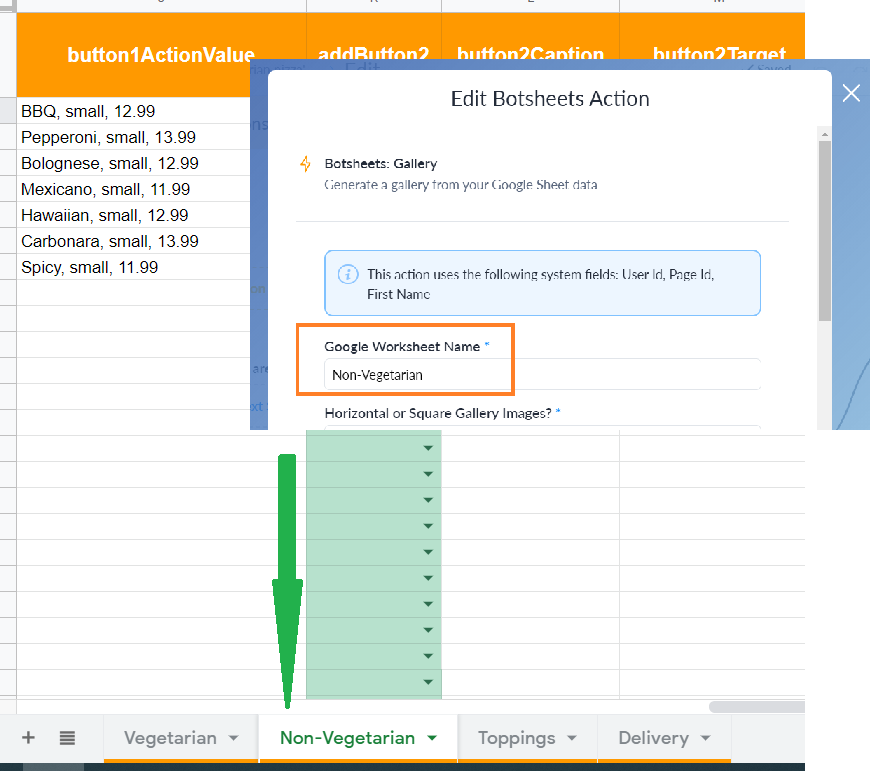
8. Go to ManyChat Automation/Flows, find the flows under the number 3 – ‘Vegetarian pizza’ and ‘Non-Vegetarian pizza’, click ‘Edit’ the flows and make sure the Botsheets app generates a gallery from your Google Sheet data. Save actions and make the flows published.
Test out the bot from scratch and you will see the galleries with Vegetarian and Non-Vegetarian pizzas generate automatically from your Google Sheets template:
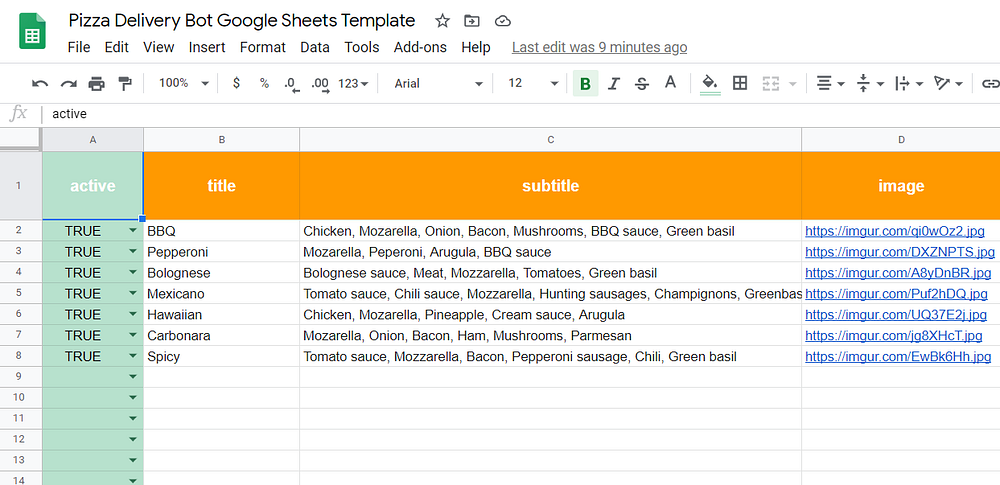
Now is the time to customize your Google Sheets template and adapt menu items for your pizza restaurant
Column ‘active’ is responsible to make a current item active or not active
Column ‘title’ is an item of your menu in a ManyChat gallery
Column ‘subtitle’ is an item description
Column ‘image’ is a picture of an appropriate item
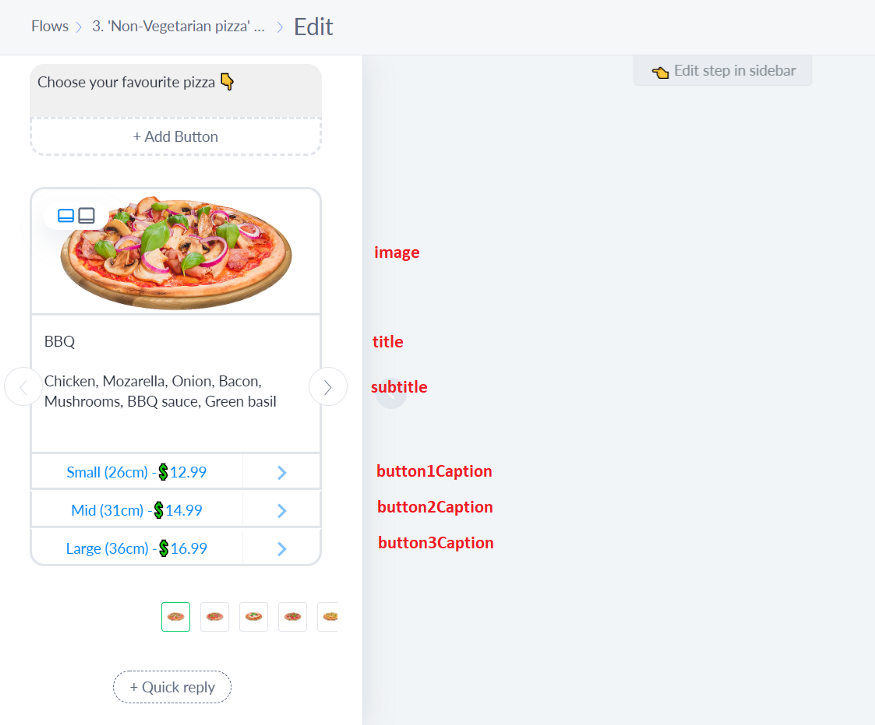
This is how it looks in your bot:
Columns ‘addButton1’, ‘addButton2’, ‘addButton3’ connect 3 buttons to each card of the gallery
Columns ‘button1Target’, ‘button2Target’, ‘button3Target’ link to a specific ManyChat flow. In our case, it will be the flow #4 – ‘Pizza customization’.
You can get the flow ID in your Manychat dashboard by navigating to the specific flow and then viewing the URL.
Copy everything after the files/ and paste it to your ‘button1Target’, ‘button2Target’, ‘button3Target’ columns:
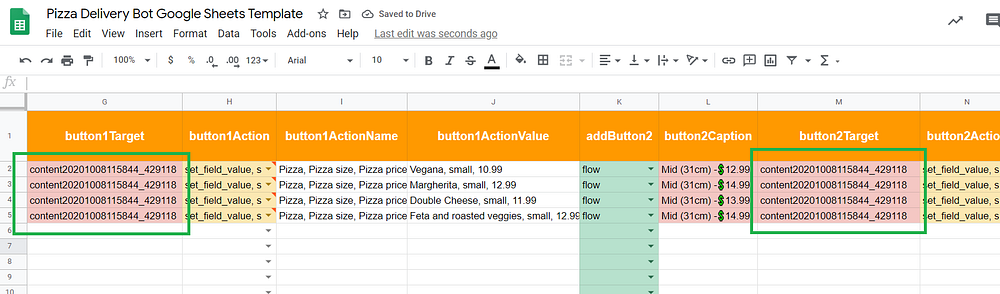
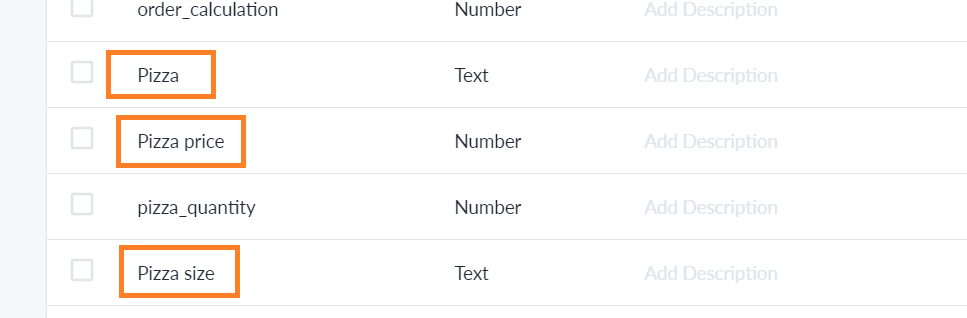
Columns ‘button1Action’, ‘button2Action’, ‘button3Action’ set up custom field values. DO NOT DELETE or CHANGE THEM – these will save values for ‘button1ActionName’, ‘button2ActionName’, ‘button3ActionName’ custom fields.
Columns ‘button1ActionName’, ‘button2ActionName’, ‘button3ActionName’ set the values for custom fields Pizza, Pizza price, Pizza size when clicking on the appropriate button in the gallery.
Columns ‘button1ActionValue’, ‘button2ActionValue’, ‘button3ActionValue’ are the actual values for these custom fields.
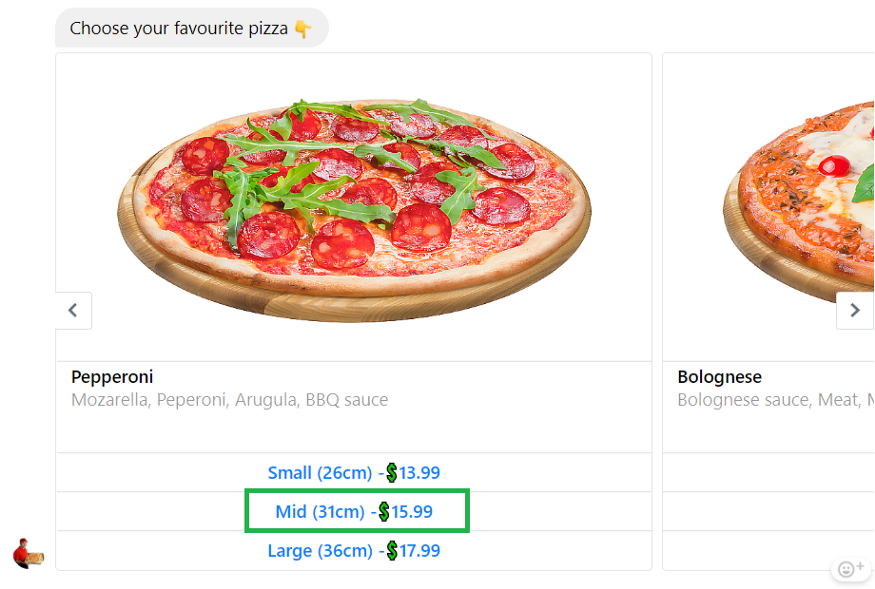
💡 Example: When clicking on Pepperoni mid-size pizza for $15.99, the ‘button2ActionValue’ – Pepperoni, mid-size, 15.99 will set up values for Pizza, Pizza size, Pizza price custom fields for the ‘button2ActionName’ column and send data back to the ManyChat.
You can get more information on how Botsheets works here.
❗ Please note, if you rename sheets, you will need to change the Google Worksheet Name in the Botsheets Action.
The next part is to add the ability to customize your pizza (or anything else) with the help of webviews
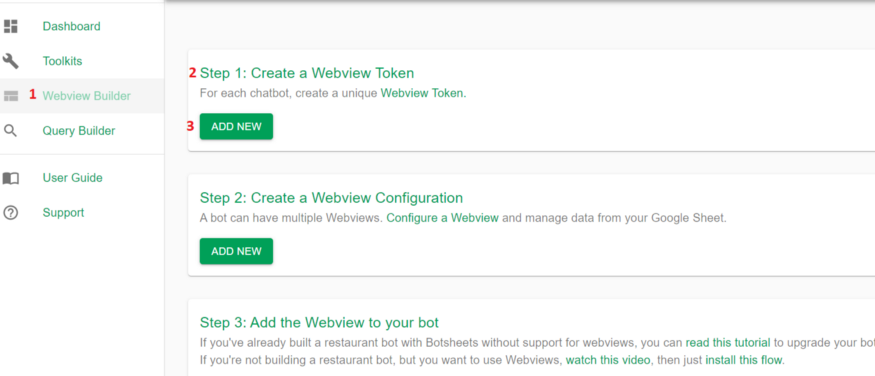
1. Login with your Google account on https://app.botsheets.com. Go to: Webview Builder/Create a Webview Token/Add New
2. When your Webview Token is generated, click the icon to copy it to your clipboard, get back to your ManyChat Settings/Custom Fields/Bot Fields and paste the token into the Bot Field Value:
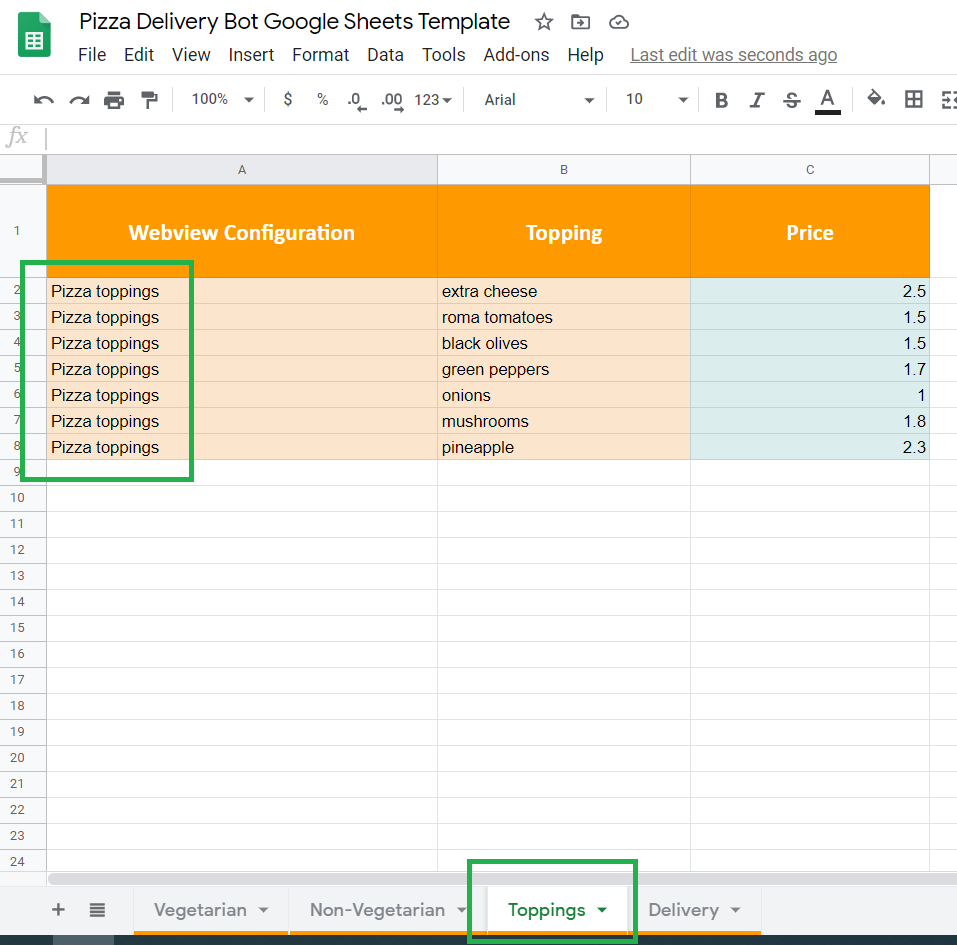
2. Create a Webview Configuration and name it ‘Pizza toppings’.
When you create a Webview Configuration, you need to make sure that your Webview Configuration name in the Botsheets dashboard matches with a configuration name in your Google Sheet template/’Toppings’ sheet.
If you’d like to change the Configuration Name, make sure you changed correctly it on your Botsheets dashboard and your Google Sheets template.
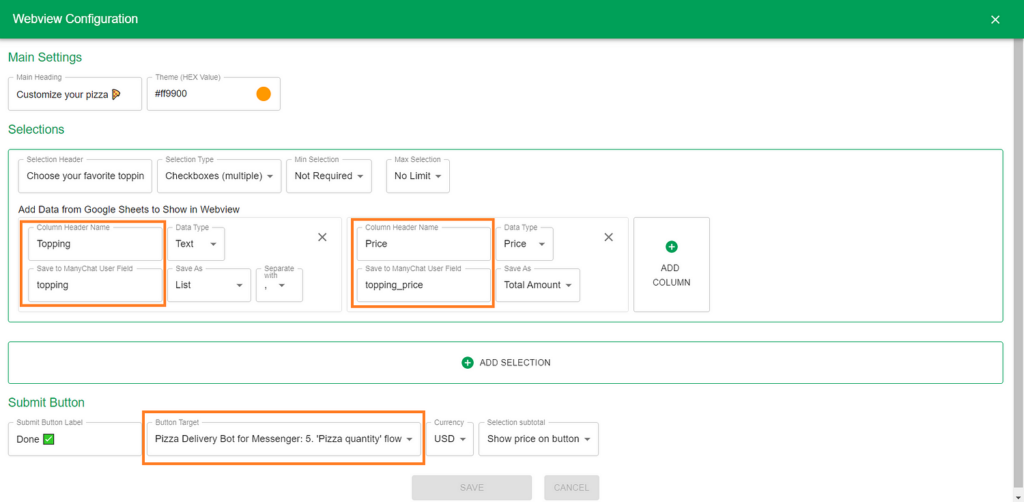
3. You’ll need to group selections with a heading. For each column under the heading, you would reference a Header Column Name. When customers make selections choose a specific Custom User Field to save that data. You can also choose how the data will be saved.
‘Column Header Name’ must be exactly like the header in the ‘Toppings’ sheet (i.e. Topping and Price).
‘Save to ManyChat User Field’ must contain the exact custom fields (i.e. topping and topping_price).
Again… If you want to change any header in the worksheet, don’t forget to change the ‘Column Header Name’ as well.
At the bottom of the configuration screen, you can see the ‘Submit Button’ options. Under the ‘Button Target’ choose flow #5 – ‘Pizza quantity’ which starts right after a customer clicks ‘Done ✅’ at the bottom of the webview.
Save your configuration and test out the customization options!
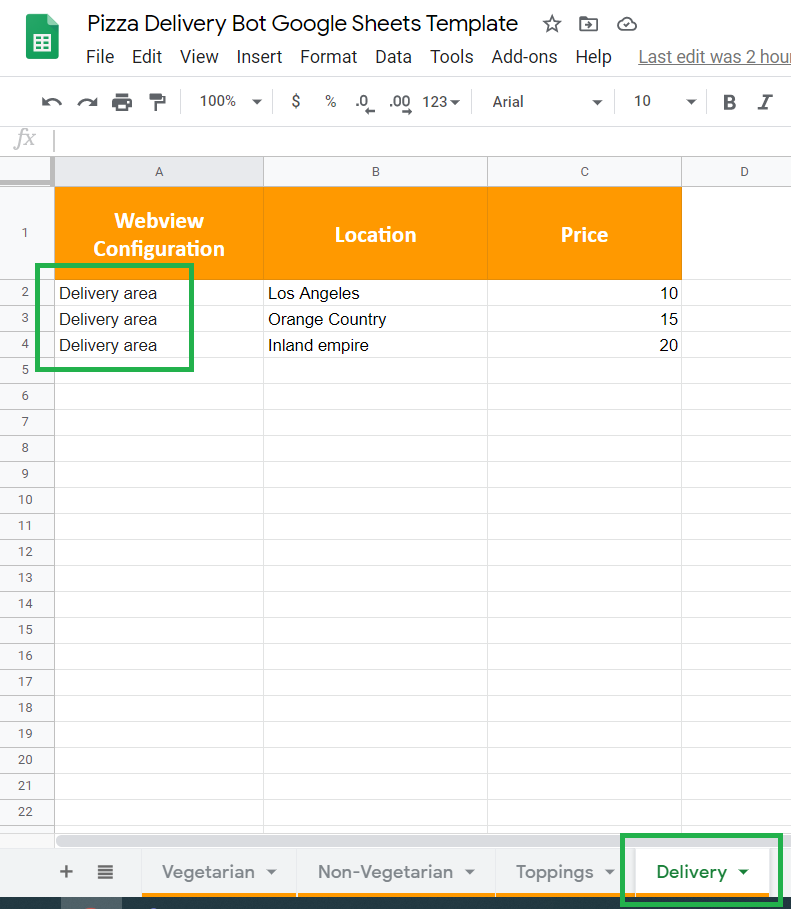
Now let’s set up delivery options
If you offer delivery for different locations, you can charge a different delivery price based on the location.
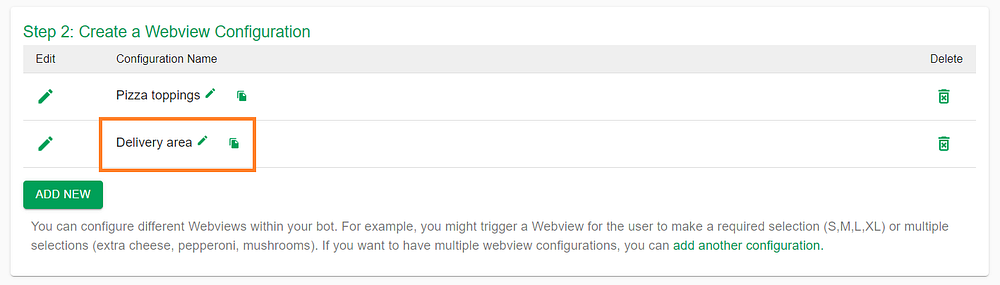
1. Create another Webview Configuration on your Botsheets dashboard and name it ‘Delivery area’.
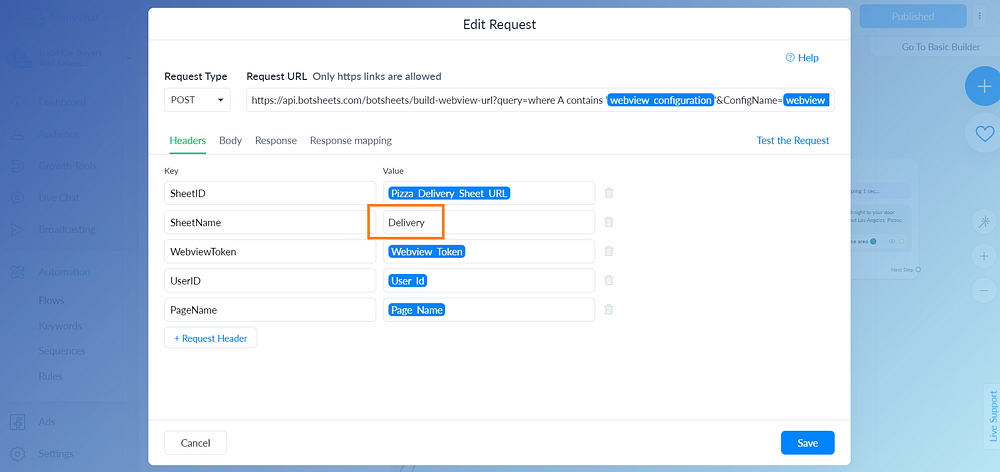
2. Find a worksheet named ‘Delivery’, add your delivery locations in the ‘Location’ column and delivery prices in the ‘Price’ column. If you’d like to rename the worksheet, you will need to change the SheetName Value in the External Request, which you can find in flow #9 – ‘Pick-up/Delivery’:
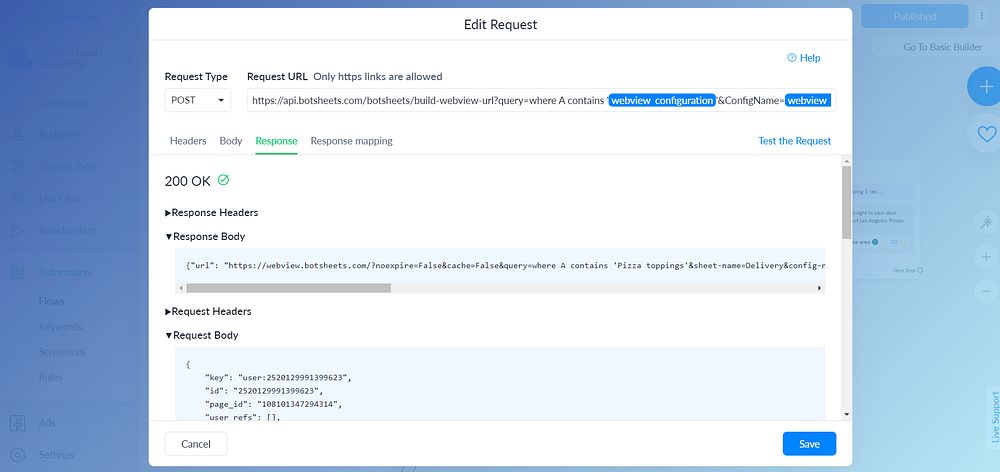
If you did that, test the request to make sure you have the ‘200 OK’ response:
3. Set up a Webview Configuration like at the screenshot below:
4. At the bottom of the configuration screen, you will see the ‘Submit Button’ options. Under the ‘Button Target’ choose flow #10 – ‘Complete order’ and save your configuration.
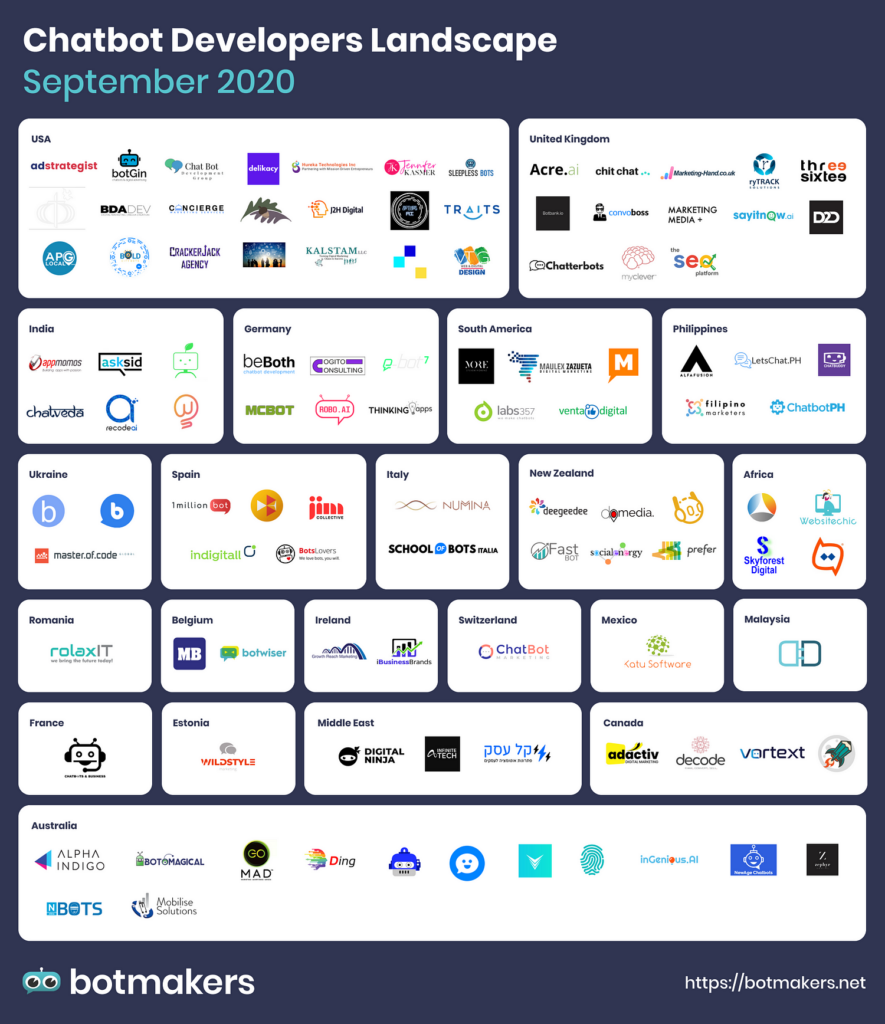
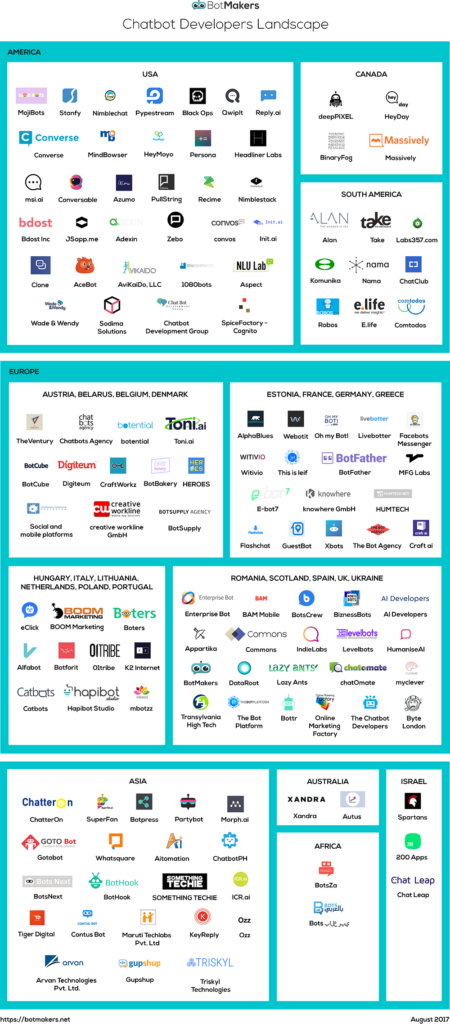
With messaging apps on the rise the world of chatbots grows, the niche strengthens, many agencies added chatbots to the list of services and established on the market.
The market of chatbots is projected to grow
Looking back at 2017’s Landscape, we can see how the United States is still leading in the world of chatbots, how quickly New Zealand and the United Kingdom grow and how rocks the market Australia. Some European countries, like Germany and Spain, gain momentum by offering bot development services as well.
If look closely, we can see some agencies focused narrowly on a specific niche like real estate or restaurants and make inimitable bots for a lead generation or food delivery service.
Some agencies go even further and offer a variety of chatbot services. For example, Mother of Copy is a bot marketing and copywriting agency, they create chatbots and humanize them with unmistakable text.
YouTube is the most popular social platform among U.S. adults. Getting more views and acquire new subscribers is not an easy task. It’s 2020, and you’re here because you want those views and subscribers on YOUR YouTube channel.
But how you can distribute your YouTube content faster and easier?
The answer is with the help of your ManyChat Bot, because everyone uses Facebook Messenger today. If you want to allow your bot users watching your YouTube videos in your Messenger bot directly, this ManyChat bot template + Integromat = the best solution.
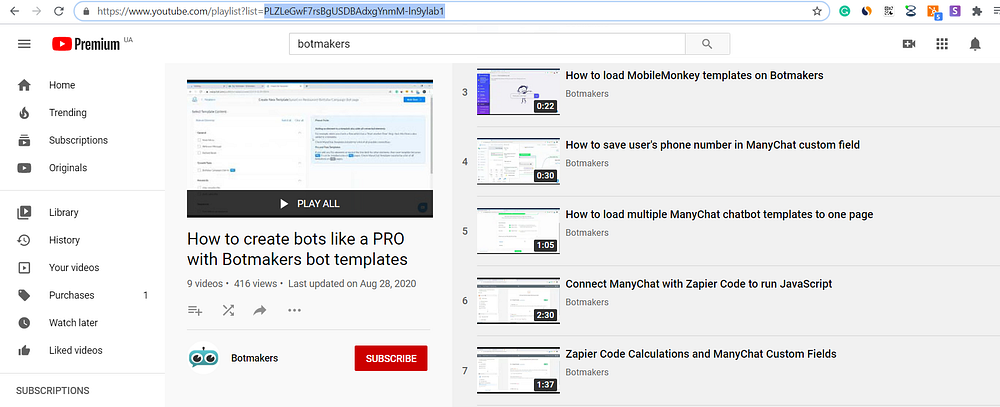
Let’s start with YouTube RSS feed tip tutorial…
1. Find RSS Feed URLs for YouTube Channels and YouTube Playlist
1.1 The first RSS feed we’re going to find is a YouTube channel RSS.
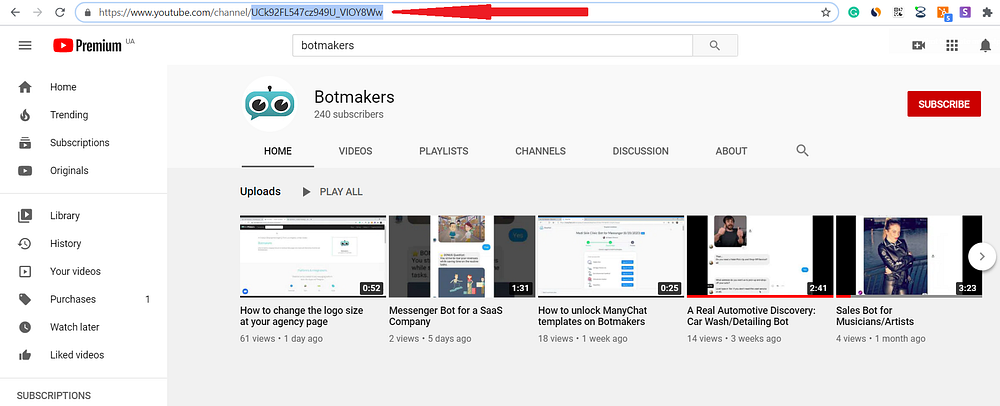
Open your YouTube channel, find a URL in the search bar and copy the text right after the https://www.youtube.com/channel/
Copy that text
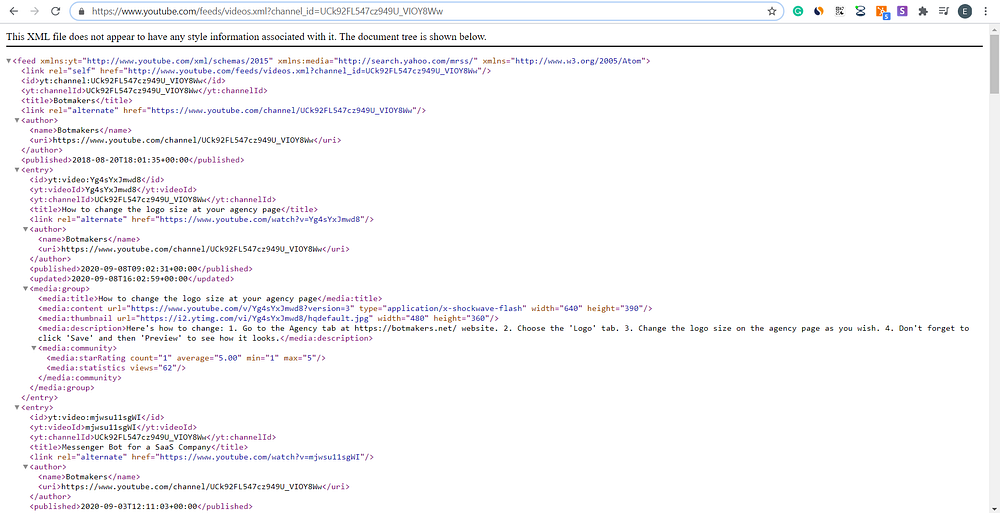
Get this link https://www.youtube.com/feeds/videos.xml?channel_id= and at the end of it just paste that text
💡 Example: in my case, it’s going to be https://www.youtube.com/feeds/videos.xml?channel_id=UCk92FL547cz949U_VIOY8Ww
Click enter. If can see something similar, you made it right!
1.2 Next thing RSS feed we’ll go over is a YouTube playlist RSS.
Find a playlist you want to have the RSS feed for
Once you have a playlist opened like this 👇 copy all the text after the equal sign
Get this link https://www.youtube.com/feeds/videos.xml?channel_id= and paste that text at the end of it
Here you go, you have the RSS feed for your playlist!
This will allow you to add a YouTube channel and a YouTube playlist to the RSS reader and connect it with ManyChat with the help of Integromat.
Connect your Manychat account to Integromat. You need to obtain the API Token, get it here: Manychat dashboard > Settings > API > Generate Your Token 👇
Copy the API key, go to Integromatand add a new scenario: Integromat > Scenarios > Create a new scenario 👇
2.1 Add ‘ManyChat’ module as the first module in your scenario
Select ‘Watch Incoming Data’. This triggers when a ManyChat action is performed and returns the subscriber’s details
Enter the name for the webhook and then, enter the API Token you have copied to the respective field
Click the ‘Continue’ button to establish the connection 👇
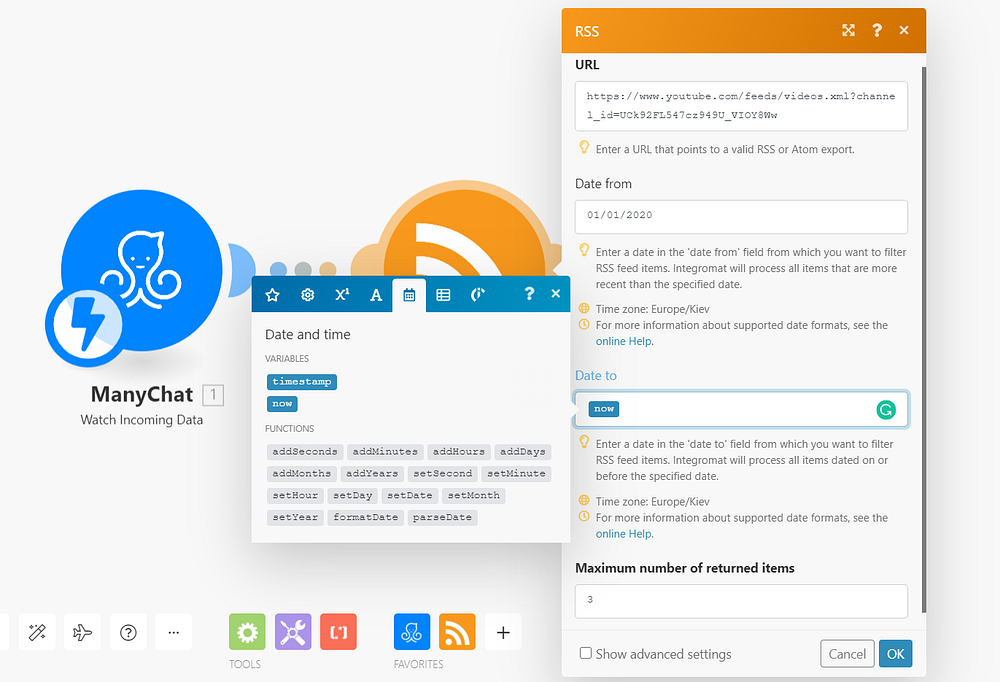
2.2 The next step is to connect RSS app.
Choose ‘Retrieve RSS feed items
URL field – paste the generated YouTube channel or YouTube playlist URL
Date from field – enter a date from which you want to filter RSS feed items
Date to field – choose ‘now’ from variables 👇
Maximum number of returned items – choose how many videos you want to show for your Messenger subscribers
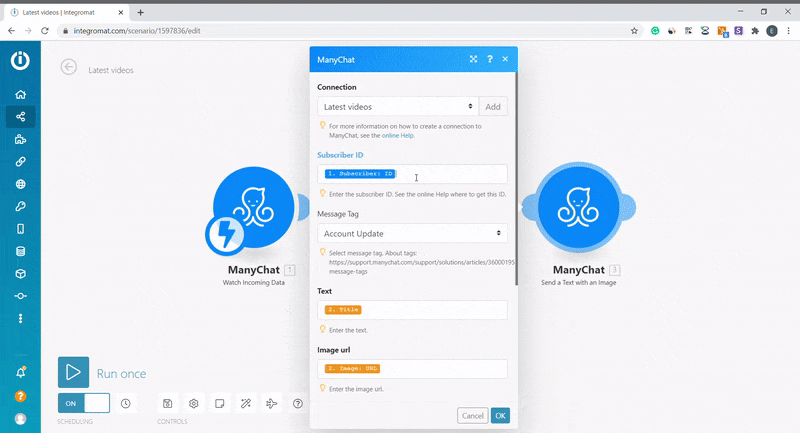
2.3 Add ‘ManyChat’ module as the third module in your scenario
Select ‘Send a Text with an Image’
Choose your connection
Subscriber ID field– enter the subscriber ID from ‘ManyChat – Watch Incoming Data ‘ list
Message Tag field – select message tag. Mere info about tags here
Text field – choose ‘TITLE’ from variables in ‘RSS – Retrieve RSS feed items’ list. This will add the title of your video/videos
Image url field – choose ‘Image: URL’ from variables in ‘RSS – Retrieve RSS feed items’ list. This will add the main image from your YouTube video/videos
Buttons:
Type – select Url
Caption – give the titles for buttons in your bot
Url – choose ‘URL’ from variables in ‘RSS – Retrieve RSS feed items’ list. This will add the link to your YouTube video/videos
Webview size – set up to ‘Native
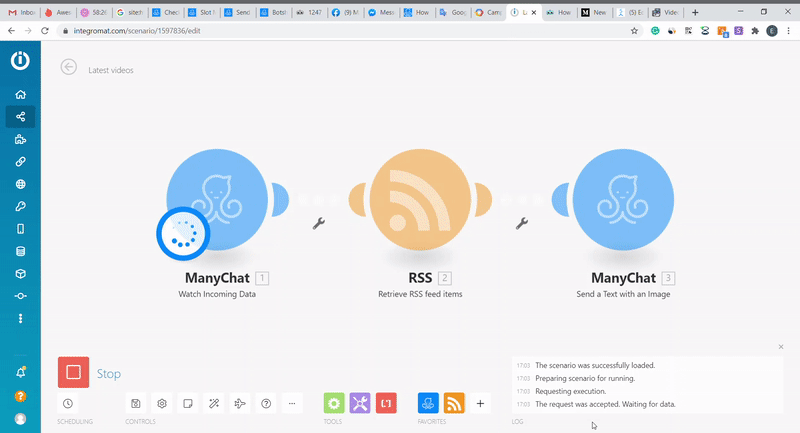
Do not forget to save your scenario and then click Run once at the bottom of the page
Now get back to your ManyChat to trigger the ‘Watch Incoming Data’ module.
Add an action to your ManyChat flow: Actions > Trigger Integromat > Choose Your Webhook > Make the flow published > Click ‘Preview’ 👇
If everything is set up correctly, Integromat will send a message: ‘The scenario run was completed.’ and you will receive cards with titles, images and buttons in your Messenger bot 👇
We’ve chosen a bot template for a YouTube channel, as the example, but RSS feed feature can be used for distributing the content through Messenger bots from personal blogs, websites, and more.
Last time we created the list of bot agencies exactly 3 years ago. Now we decided to run it again. The industry has changed many new companies joined the bot party, some companies have left.
Want to have your agency listed?
Okay. Here’s what you have to do, just 2 simple steps. 1. Sign up at https://botmakers.net/. 2. Create an agency profile. It’s required to provide information like company name, website, a short description and a logotype. The location is required too. If you’re all remote — that’s okay, just put “REMOTE” in the country and city fields.
What’s next? We’ll be checking all listings by looking at websites and manually approving each qualified company.
We try to keep it simple. You need to work on bots and your website should clearly say that. If you’re just a software development or marketing agency and have nothing about bots at your website — probably this Landscape is not the best fit for you.
How much should I pay to be listed?
Participation is 100% free. We make money by offering bot templates to agencies. But we review all companies before adding to the list.
How many companies do you plan to have on the list?
Good questions. Last time we had around 130 agencies. This time, since then the industry matured since 2017, we plan to have more.
I’m a marketer or marketing agency, am I qualified to be listed?
It’s okay if you don’t “code” you bots and create them with tools like ManyChat, Chatfuel, MobileMonkeyand others. We actually like it. Please do apply to be listed.
What’s the deadline?
The deadline is August 6, 2020.
When do you plan to publish the Bot Developers Landscape?
It will take us a week or so to create the high-resolution image with all companies listed, blog posts and newsletters.
Why participate?
Well, you never have too much coverage on the media. If you have a reason like this to tell the world about your company — don’t lose it. To be more specific, I’d expect to get new leads and clients, improve brand awareness and get a website Dofollow link.
This is the Landscape we created in August 2017.
About author
Alexander Gamanyuk is the creator of a few chatbot projects, including Botmakers(chatbot template marketplace) and Tarta.ai (assistant that helps people find jobs by sending Smart Job Alerts), ChatBottle (chatbot search engine), Airchat (bot building platform).